2486D Manual
From Smarthome
KeypadLinc™ Dimmer - INSTEON® Scene Control Keypad
with Dimmer-6 or 8-Button - Rev 5.0+
(Model: 2486D)
TABLE OF CONTENTS Hide
All
What is INSTEON?
| Since its inception in 2005, INSTEON® has become the
best-selling wireless home-control networking technology, offering more
reliability and flexibility than any other home management system on the
market. Developed by SmartLabs®, INSTEON technology relies on
its dual-mesh network to send signals both through the air (RF, or radio
frequency) and over the existing electrical wires (power line) in the
home. Reliable
How INSTEON WorksWhat makes INSTEON the most reliable home automation network is its
dual-mesh network. INSTEON devices use both radio frequency signals and
the home's existing wiring to talk to each other. Every message is
confirmed as it is received, and if any errors are detected, the message
is automatically resent. Technology Comparison
|
Key KeypadLinc Dimmer Switch Features
Tools You Will Need
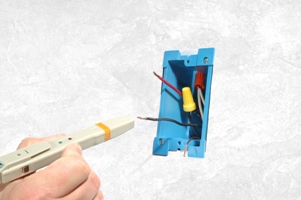
A Helpful Tool – Voltmeter or Voltage TesterDuring the installation of INSTEON devices, it may be necessary to
identify the wires inside the junction box. Knowing for sure which wire is
the LINE (sometimes called HOT) can reduce the guesswork when installing a
single switch, and it is absolutely necessary when working with multi-way
lighting circuits. A voltmeter is ideal for this application. Many of the
digital models can also read current so you can measure how much power is
being drawn by the switch’s load. |
Preparing to Install KeypadLinc Dimmer Switch
|
Read and understand these instructions before installing, and retain
them for future reference.
If you are not knowledgeable about and comfortable with electrical
circuitry, you should have a qualified electrician install KeypadLinc for
you. If you have any questions, please consult an electrician or
call: 1-800-SMARTHOME |
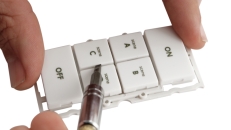
Changing to 6-Button or 8-Button Plate
Note:For proper operation, KeypadLinc must be programmed to operate in
6-button or 8-button mode, corresponding to whichever plate is attached.
See Configure
For 6 or 8-Button Operation. |
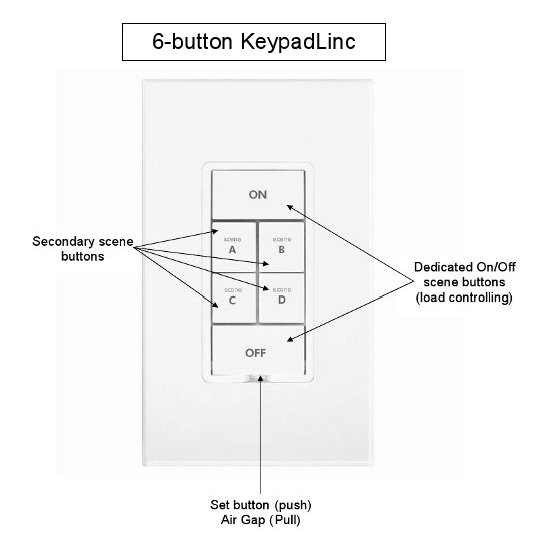
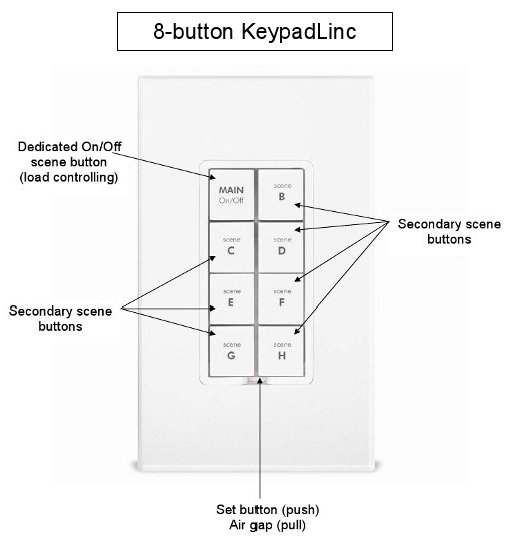
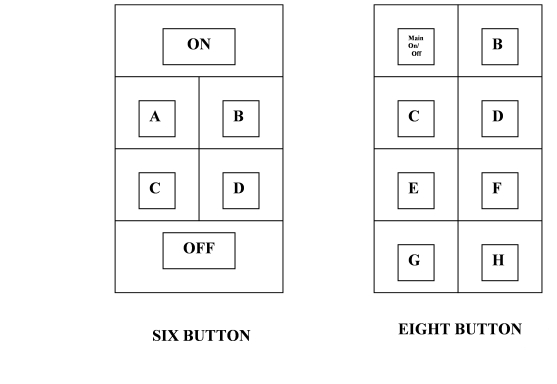
Button Nomenclature
Since KeypadLinc has removable/replaceable button labels, it can
become confusing when trying to refer to a specific button of the 6
available (or 8 buttons when the 8-button key plate is installed). Refer
to the following diagrams for button “names”.
|
Installing KeypadLinc
|
Installing KeypadLinc in a Multi-Way Circuit
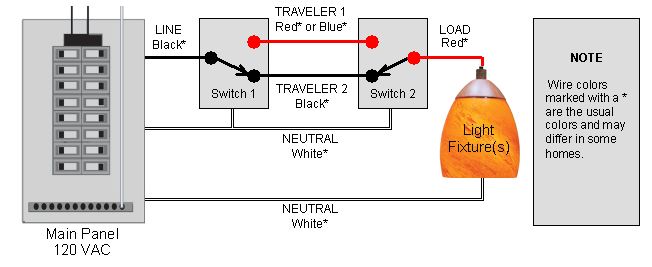
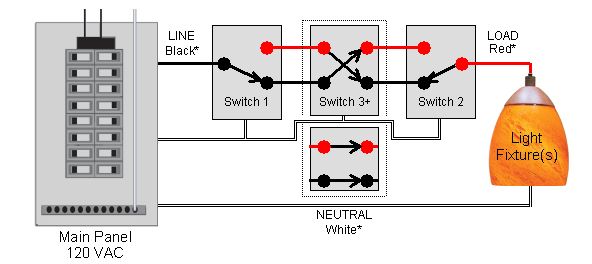
Understanding Multi-Way CircuitsIf more than one switch controls a single set of lights (called a "load"), the switches are part of a multi-way circuit. A 3-way circuit uses two switches to control a load, a 4-way circuit uses three switches, and so forth. Most homes have one or more 3-way circuits, with two switches located in hallways, stairwells, or two different entrances to a room. Less commonly found are circuits that are 4-way or above. You can use KeypadLinc to replace switches in multi-way circuits that are already wired in, or you can use them to create virtual multi-way circuits where there is no existing wiring. Here is how a wired-in 3-way circuit (with two switches) works: A wired-in 4- or more-way circuit (with three or more switches) has additional switches added in the middle of the circuit. In the diagram below, the additional switch is shown in one position in the upper box and in the other position below. To learn more about multi-way circuits, go to Google.com or another
search engine on the Internet and enter the search terms "3-way switch" or
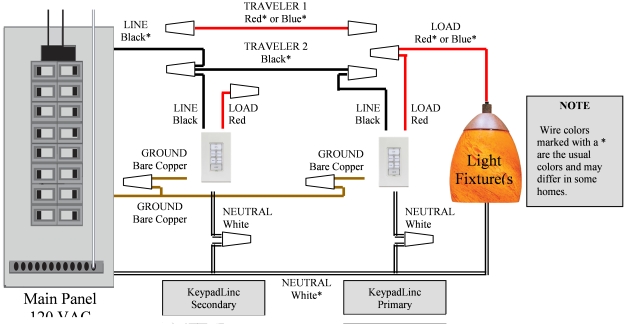
"4-way switch." Using KeypadLinc in Virtual Multi-Way CircuitsIn a virtual multi-way circuit, only one KeypadLinc, called the KeypadLinc Primary, actually controls the load in the multi-way circuit. Any additional KeypadLinc switches, called KeypadLinc Secondaries, are not connected to the load, but only to the power line (by being wired to the LINE and NEUTRAL). All of the KeypadLinc switches can communicate with one another using INSTEON networking on the power line. After wiring in the KeypadLinc switches, you create the virtual multi-way circuit by setting up all of the KeypadLinc switches to control each other (see Cross-Linking More Than One KeypadLinc). The diagram below shows how you convert a wired-in 3-way circuit into a virtual 3-way circuit using two KeypadLinc switches. Step-by-step instructions for wiring in the KeypadLinc switches are in the next section.
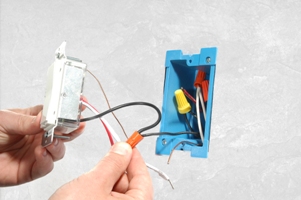
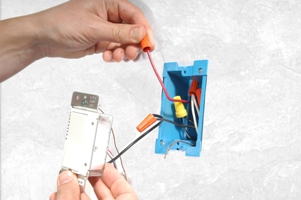
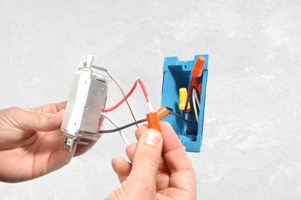
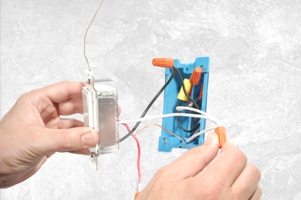
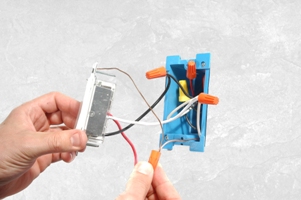
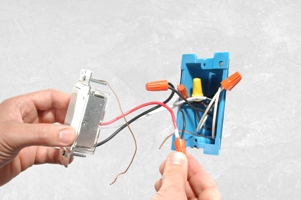
Step-by-Step Instructions For Installing Multi-Way KeypadLinc SwitchesWhen replacing a 3-way mechanical switch, each switch will have three
wires connected to it from the wall box. Four-way or greater circuits will
have four wires connected to the switches in the center of the circuit.
For this tutorial, we will follow the most commonly used wire colors for
homes in North America.
Special Treatment for 4- or More-Way CircuitsIf your lighting circuit includes more than two switches controlling a single set of lights, those extra switches will have four wires connected to them. Two of the wires are TRAVELERS from the preceding switch and the other two are TRAVELERS to the next switch in the chain. You will be converting the black TRAVELER wires to LINE wires and replacing the old 4-wire switches with KeypadLinc Secondaries.
| |||||||||||||||||||||||||||||
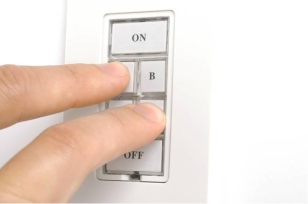
Configure For 6 or 8-Button Operation
To Change From 6-Button Plate to an 8-Button Plate
To Change From 8-Button to a 6-Button Plate
Use caution when pushing in the Set button. If you push in the Set button too far or hold the button down too long, you will perform a factory reset. |
Using the KeypadLinc Buttons
| Each of the KeypadLinc buttons is considered a "scene button", meaning
you can use any of the buttons on KeypadLinc to create INSTEON
scenes. Each button will control its own scene, only sending commands
to devices Linked specifically to that button. Dimmable Responders may
behave differently, depending on whether you tap, double-tap, or press
& hold a button to activate/deactivate a scene. Non-dimming Responders
will only turn full-on or full-off, no matter what method you use. NOTE: The light wired to KeypadLinc can only be controlled by
using the dedicated On/Off buttons. If you wish to include the light wired
to KeypadLinc in a scene, you must use the dedicated On/Off button.
Activating/Deactivating Scenes with the KeypadLinc buttons:
|
Using the Air Gap
| The "air gap" can be useful for replacing bulbs or any other time you
want the controlled circuit to be unpowered without turning off the
circuit breaker. To disable power, pull the Set button at the bottom of the switch out
as far as it will go (about 1/8 inch). This will open the mechanical
contacts and will remove all power from the INSTEON device and the load
that it controls until the Set button is pushed back in. However, because
the INSTEON device's settings are stored in non-volatile memory, setup
information will not be lost when the unit is unpowered. |
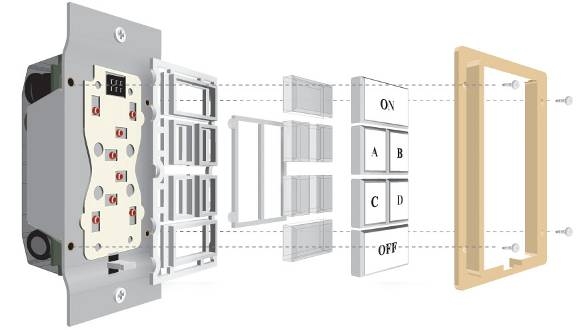
Changing KeypadLinc Buttons
The KeypadLinc buttons may be changed so you can customize its
appearance.
|
Linking KeypadLinc to Control an INSTEON Device
| To use KeypadLinc to control other INSTEON devices, follow these steps
to Link KeypadLinc and the Responder together. Refer to your Responder's
Owner's Manual for more detail instructions on how to properly install the
Responder and Link it to KeypadLinc.
|
Unlinking a Controlled INSTEON Device from KeypadLinc
| If you are no longer going to use an INSTEON device that has been
previously Linked to KeypadLinc, it is very important that you Unlink it.
Otherwise, KeypadLinc will retry any commands intended for the unused
INSTEON device, thus slowing down your system. Refer to your INSTEON
Responder's Owner's Manual for more detailed instructions. The following will work for the most common INSTEON devices:
|
Linking KeypadLinc to an INSTEON Controller
| To use KeypadLinc as an INSTEON Responder, follow these steps to Link
KeypadLinc and an INSTEON Controller device together. Refer to your
Controller's Owner's Manual for more detailed instructions on how to
properly install it and Link it to KeypadLinc. The following will work for the most common INSTEON devices:
|
Unlinking KeypadLinc from an INSTEON Controller
| If you are no longer going to use a KeypadLinc that has been
previously Linked to an INSTEON Controller, it is very important that you
Unlink it. Otherwise, the Controller will retry any commands intended for
the unused KeypadLinc, thus slowing down your system. Refer to your
Controller's Owner's Manual for more detailed instructions. The following will work for the most common INSTEON devices:
|
About On-Levels and Ramp Rates
| The On-Level is the brightness that the light you are
controlling will go to when you turn it on. The On-Level is adjustable
from off to 100% brightness. The default is 100%. The Ramp Rate sets the time it will take for the light you are
controlling to go from off to the On-Level brightness, or from the
On-Level brightness to off. This time is adjustable from 0.1 seconds to
ramp between full-on and full-off. The default is 0.1 seconds (or 0.5
seconds for SwitchLinc models only).
A single INSTEON device is capable of storing multiple On-Levels and
Ramp Rates. If you'd like, you can Link different On-Levels or Ramp Rates
for each Controller (or each button if it is a multi-scene Controller).
|
Setting the On-Level
The On-Level is the brightness that the light you are controlling will
go to when you turn it on. The On-Level is adjustable from off to 100%
brightness. The default is 100%.
To set your dimmer's On-Level:
If you are setting an On-Level to a new device for the first time, you
will need to set the On-Level twice. |
Setting the Ramp Rate
The Ramp Rate sets the time it will take for the light you are
controlling to go from off to the On-Level brightness, or from the
On-Level brightness to off. This time is adjustable from 0.1 to 9 seconds
to ramp between full-on and full-off. The default is 0.1 seconds (or 0.5
seconds for SwitchLinc models only).
To set your dimmer's Ramp Rate:
|
Creating an INSTEON Scene
| INSTEON scenes let you activate dramatic lighting moods with the press
of just one button. For example, you can set all your lights in a scene to
dim to 50%, or turn certain lights on while turning others off, all with
one tap on a Controller. INSTEON scenes are very easy to set up - just Link more than one
INSTEON Responder to the same On/Off or Scene button pair on an INSTEON
Controller. Then, when you press any of the Linked buttons on the
Controller, all of the INSTEON devices Linked in the scene will respond as
a group. |
Multi-Linking and Multi-Unlinking
Multi-LinkingMulti-Linking Mode allows you to Link multiple INSTEON devices to a
single Controller, one after the other. Once in Multi-Linking Mode, you
can Link any number of Responders without having to press & hold the
Controller's On button for 10 seconds for each Responder. Using
Multi-Linking Mode is the fastest way to create
an INSTEON scene.
Multi-UnlinkingMulti-Unlinking Mode can be used to quickly remove devices from an
INSTEON scene. You may remove as many of the Linked Responders from the
scene as you would like.
|
Cross-Linking More Than One INSTEON Device
Cross-Linking in a 3-Way CircuitCross-Linking switches allows you to track the on/off status of the
load on all Linked INSTEON switches. For this example we will use a
primary switch controlling the load and one secondary in a virtual 3-way.
They will be referred to as: Primary Switch (load-controlling) and
Secondary Switch.
Upon successful completion, each switch in the above scenario will now track the on/off status on the LED of the other switches it has been Cross-Linked to. Cross-Linking in a Multi-Way Circuit Using Multi-Link ModeWhen you have more than two switches controlling a single light, you
can use a feature called Multi-Linking to Link one switch to
multiple others in one step. But remember, for Cross-Linking, all
non-load-controlling switches need to be Linked to the load-Controlling
switch in a complete Link (meaning the load-controlling switch to the
controlled switch, then from the controlled switch to the load-controlling
switch).
To finish the Multi-Linking process between all your switches, you must
repeat steps 1 through 5, using each secondary switch as the starter
switch. These instructions are universal to all INSTEON devices. However, responses of the individual devices may vary, depending on the revision of the product (i.e., LED color, beeper, etc.). Refer to each device’s Owner’s Manual for specific responses during Linking procedures. |
Restoring Power to KeypadLinc Dimmer Switch
| This INSTEON device stores all of its settings in non-volatile memory,
so the settings are not lost even when power is removed. In the event of a
power loss, this device will automatically return the local load to the
level it had before the power was interrupted. |
Resetting KeypadLinc to Its Factory Default Settings
The factory reset procedure can be used to clear the KeypadLinc memory
and restore its factory default settings. This procedure will clear the
unit of all INSTEON Links, and any programmed X10 Addresses.
NOTE: Unless they have been Unlinked, INSTEON devices that have
been previously Linked to KeypadLinc will still respond to button presses,
even after a factory reset. The reason is that the INSTEON devices
themselves have not been Unlinked from the KeypadLinc. See Unlinking
a Controlled INSTEON Device from
KeypadLinc. |
Toggle Mode
Toggle Mode Rev 1.5+
An Example: You want button D to always turn its group on.
The button is now non-toggle on and will send ON to its group every
time it is pressed. Toggle Mode On/Off
An Example: You want button D to always turn its group on.
The button is now non-toggle on and will send ON to its group every
time it is pressed. |
Grouping Buttons
| Buttons can be grouped in an interdependent, exclusive-OR fashion,
where pressing one button in a group triggers an ON command for the
devices/scene assigned to that button. Grouping is helpful when you have
multiple devices or scenes, and you’d like to be able to easily cycle
through these devices/scenes with an LED indicator of which device/scene
is active.
|
Variable Backlight Brightness
| KeypadLinc button backlighting (LED) can be set to 1 out of a
possible 32 brightness levels.
For 6-Button Mode
|
Enabling / Disabling the Beep Mode
| The KeypadLinc buttons can be set to Beep Mode, so the unit will beep
every time a button is pressed.
(Factory default is off.)
|
Setting the X10 Primary Address
| Most INSTEON devices are X10 ready, meaning that they can respond to
X10 commands from any X10 Controller. However, to operate an INSTEON
device in X10 mode, you must first set up an X10
Primary Address. As it ships from the factory, or after a factory
reset procedure, INSTEON devices will have no X10 Primary Address set up.
|
Removing the X10 Primary Address
If you are no longer going to control an INSTEON device with an X10
Address, it is very important that you Unlink it, because otherwise the
INSTEON device will respond to the X10 command and may cause the unit to
turn on by itself.
|
Setting the X10 Ramp Rate and X10 On-Level for the X10 Primary Address
| When an X10 Controller sends an X10 ON or X10 OFF command to the
INSTEON dimmer’s Primary X10 Address, the local Ramp Rate and local
On-Level apply. In other words, the INSTEON dimmer acts the same way as it
would if you manually tapped its switch.
See the section Setting the Ramp Rate and/or Setting the On-Level for instructions on setting up the local Ramp Rate and local On-Level. NOTE: If you want an X10 Ramp Rate and On-Level other than the
local values, you can set up one or more X10 Scene Addresses as described
in the sections Remotely
Setting the Ramp Rate for an X10 Scene Address and Remotely
Setting the On-Level for an X10 Scene
Address. |
Enabling and Disabling X10 Resume Dim
| If X10 Resume Dim is enabled, the INSTEON dimmer will remember the
last brightness level to which it was set. Then, when an X10 ON command is
received from an X10 Controller, the light will go to the remembered
brightness, rather than to the X10 On-Level.
To enable X10 Resume Dim, set up a local On-Level of off (or zero). To
disable X10 Resume Dim, set up a local On-Level of anything but off. See
Setting
the On-Level for instructions on setting up the local
On-Level. |
About the Advanced X10 Programming Options
| You can remotely set up X10 Scene Addresses as well as On-Levels and
Ramp Rates using an X10 Controller capable of sending an X10 address
(house code and unit code) without sending X10 on or off commands.
The following procedures in the next few sections will not work with a
transmitter that sends the X10 address and an X10 command together. X10
Controllers in which one button is pressed to turn an X10 device on or off
WILL NOT WORK.
These procedures all begin by sending the same sequence of five X10
addresses, called the CLEAR Sequence. After you send the CLEAR Sequence,
you have about 4 minutes to finish the procedure before automatic
timeout. |
Remotely Setting the Ramp Rate for the X10 Primary Address
| If you use this method for setting the Ramp Rate, you can achieve Ramp
Rates ranging from 0.1 second to ~8 minutes, 30 seconds. If you use the
manual method in the section Setting
the Ramp Rate, you can only achieve Ramp Rates ranging from 0.1 second
to 9 seconds.
Remotely setting the Ramp Rate has exactly the same effect as manually
setting the local Ramp Rate.
|
Remotely Setting the On-Level for the X10 Primary Address
This method of setting the On-Level has exactly the same effect as
manually setting the local On-Level as explained in Setting
the On-Level.
|
About X10 Scene Address Programming
| This INSTEON device can be a member of up to 255 X10 scenes. An X10
Scene Address is just another X10 address like the X10
Primary Address . When an X10 ON command is sent to an X10 Scene
Address, every X10 scene-enabled device with that X10 Scene Address will
turn on to its independent On-Level at its independent Ramp Rate (if a
dimmable device). Sending an X10 OFF command to an X10 Scene Address will
turn off all devices that are members of that X10 scene, each at its
independent Ramp Rate. X10 scene-enabled devices will react to DIM and
BRIGHT commands after the X10 Scene Address is sent (if the device is a
dimmer). However, they will ignore ALL ON and ALL OFF commands for the X10
Scene Address. |
Remotely Setting the Ramp Rate for an X10 Scene Address
The Ramp Rate of each module in each X10 Scene is adjustable. If this
setting is not adjusted, the INSTEON dimmer will use the Ramp Rate for its
X10 Primary Address.
|
Remotely Setting the On-Level for an X10 Scene Address
|
Remotely Removing an X10 Scene Address
|
Understanding Why an INSTEON Network Is Reliable
| INSTEON messages travel throughout the home via power line on the
existing house wiring, or wirelessly via RF using Access Points or other dual-band products. As the
messages make their way to the INSTEON devices being controlled, they are
picked up and retransmitted by all other INSTEON devices along the way.
This method of communicating, called a mesh network, is very reliable
because each additional INSTEON device helps to support the overall
network. To further ensure reliability, every INSTEON device confirms that it
has received a command. If an INSTEON Controller does not receive this
confirmation, it will automatically retransmit the command up to five
times. |
Further Enhancing Reliability
|
Using Dual-Band INSTEON Products to Upgrade Your INSTEON Network
| Dual-band INSTEON products, such as Access Points, are
ideal for improving signal strength and network coverage throughout your
home. Dual-band products simultaneously transmit INSTEON signals to both
power phases in your home (RF and power line). Without a reliable method
for coupling opposite power phases some parts of your home may receive
signals intermittently. With at least one dual-band product plugged into
one of the power phases, and at least one more plugged into the opposite
power phase, INSTEON signals will be strong everywhere in your
home. Dual-band products also translate RF signals into power line signals,
allowing communication between RF-only and power line-only INSTEON
devices. While only one properly installed dual-band product is needed to
translate signals between the two phases, it is recommended to have at
least two dual-band products for the best INSTEON network
performance. |
About INSTEON and X10
Possible BoosterLinc Interference with INSTEONIf you have installed older SmartLabs Plug-In BoosterLinc™
X10 Signal Boosters or certain other BoosterLinc-enabled products, the
older BoosterLinc technology may interfere with INSTEON communications.
Plug-In BoosterLinc X10 Signal Boosters, SmartLabs (#4827) shipped after
February 1, 2005, with V3.0 or later firmware, are fully compatible with
INSTEON.
Try unplugging the older BoosterLinc X10 Signal Boosters to see if this
helps with INSTEON interference, If it does, please call Smarthome Tech
Support at 800-762-7846 for help with replacing your older BoosterLinc X10
Signal Boosters with newer INSTEON-compatible ones.
How INSTEON Effects X10If your existing X10 devices seem to be working less reliably after
installing INSTEON devices, remember that INSTEON devices can absorb X10
signals just as X10 devices do, and that INSTEON devices do not repeat X10
signals. Installing INSTEON-compatible BoosterLinc X10 Signal Boosters
(#4827), or a SignaLinc™ Plug-In Coupler-Repeater (#4826), can
increase X10 signal levels. |
Troubleshooting KeypadLinc Dimmer Switch
|
KeypadLinc Dimmer Switch Specifications
| See KeypadLinc Dimmer - INSTEON 6-Button Scene Control with Dimmer Specificationson Smarthome.com |
Certification
This product has been thoroughly tested by ITS ETL SEMKO, a nationally
recognized independent third-party testing laboratory. The North American
ETL Listed mark signifies that the product has been tested to and has met
the requirements of a widely recognized consensus of U.S and Canadian
product safety standards, that the manufacturing site has been audited,
and that the manufacturer has agreed to a program of quarterly factory
follow-up inspections to verify continued conformance.  |
Limited Warranty
Seller warrants to the original consumer purchaser of this product that, for a period of two years from the date of purchase, this product will be free from defects in material and workmanship and will perform in substantial conformity to the description of the product in this Owner's Manual. This warranty shall not apply to defects or errors caused by misuse or neglect. If the product is found to be defective in material or workmanship, or if the product does not perform as warranted above during the warranty period, Seller will either repair it, replace it or refund the purchase price, at its option, upon receipt of the product at the address below, postage prepaid, with proof of the date of purchase and an explanation of the defect or error. The repair, replacement, or refund that is provided for above shall be the full extent of Seller’s liability with respect to this product. For repair or replacement during the warranty period, call SmartLabs customer service to receive a RA # (return authorization number), properly package the product (with the RA# clearly printed on the outside of the package) and send the product, along with all other required materials, to:
LimitationsThe above warranty is in lieu of and seller disclaims all other
warranties, whether oral or written, express or implied, including and
warranty or merchantability or fitness for a particular purpose. Any
implied warranty, including any warranty of merchantability or fitness for
a particular purpose, which may not be disclaimed or supplanted as
provided above shall be limited to the one-year period of the express
warranty above. No other representation or claim of any nature by any
person shall be binding upon seller or modify the terms of the above
warranty and disclaimer. In no event shall seller be liable for special,
incidental, consequential, or other damages resulting from the possession
or use of this product, including without limitation damage to property
and, to the extent permitted by law, personal injury, even if seller knew
or should have known of the possibility of such damages. Some states do
not allow limitations on how long an implied warranty lasts and / or the
exclusion or limitation of damages, in which case the above limitations
and / or exclusions may not apply to you. You may also have other legal
rights that may vary from state to state. INSTEON Technology PatentU.S. Patent No. 7,345,998, International patents pending TrademarkINSTEON, ICON, Plug-n-Tap, ApplianceLinc, BoosterLinc, ControLinc,
FilterLinc, HouseLinc, In-LineLinc, I/O Linc, IRLinc, KeypadLinc,
LampLinc, OutletLinc, PowerLinc, ProbeLinc, RemoteLinc, SignaLinc,
SmartLinc, SocketLinc, SwitchLinc, TempLinc, TesterLinc, TimerLinc,
ToggleLinc, TriggerLinc, Smarthome, SmartLabs, and SmarthomeLive are
trademarks of SmartLabs, Inc. |
